First off – This blog post is not sponsored. I’m really excited about the experience I had with Sticker Mule, and I want you to know about it.
Have you ever wanted a sticker of a pet, maybe your kids, or a cool design? Do you have a cool design or logo of your own? In the days leading up to VMworld I thought it would be great to have some custom stickers to slap on my gear and do some free advertising for my blog while I travel around VMworld. The folks at Sticker Mule helped to make my dreams come true and the process was so easy! It was also extremely affordable because I was able to get 10 die cut stickers for $9 so I could see what my design would look like as a sticker. Continue reading on as I share my wonderful experience working with Sticker Mule!
Design
So, admittedly, I am more tech savvy than most, however creating your own design is easier than you think. The biggest thing you need to be concerned about is copy right laws. Make sure you either create your own original images, or have permissions to use an image you found on the internet. It’s important to note that permissions will vary. If you just want to use the logo for your own purposes you may pay one fee, however if you want to use a logo or created image in order to produce and sell you’ll likely pay a higher fee.
You also don’t need an expensive Photoshop license to get the job done either. To create my proofs I simply used Gimp, or GNU Image Manipulation Program, which is an open source version and has all the same capabilities as Photoshop.
Now, Sticker Mule does a whole lot more than just die cut stickers (like square stickers, round stickers, packing tape, magnets, buttons, packing tape, custom packaging, and more) so depending on what you’re looking to create you can use their awesome templates as a guideline.
Placing the order
After you’ve created your design head over to Sticker Mule, select the product, size, and quantity you’d like, and then you’ll get to upload your image.
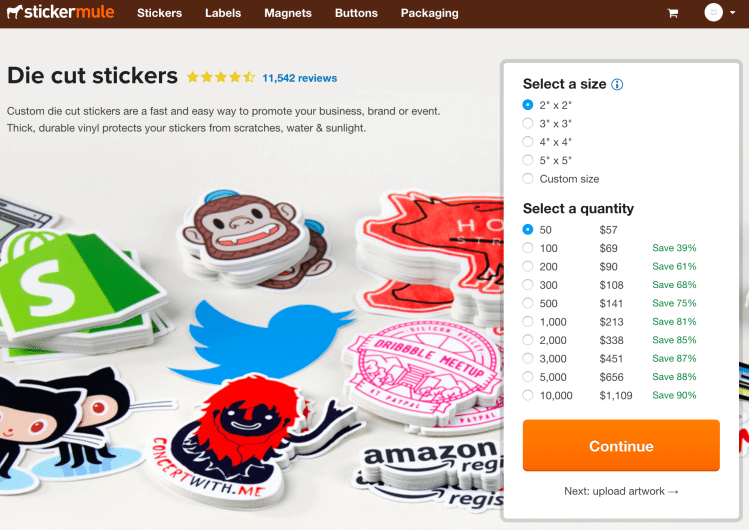
Upload your artwork and then you’ll enter in your payment info, but you will not be charged until you’ve approved your proof! Also, depending on your design, Sticker Mule will adjust the price based on the final dimensions, which is extremely generous based on the quality of these stickers!
Approving the Proof
I submitted both designs separately and in both cases the proof was ready in a matter of hours! Your experience may vary depending on your design and when you submit your order, based on your location and their business hours. Here are what both of my proofs looked like:


When you get notification that your proof is ready you can click on the link in the email and view your proof images. They’ll also tell you what the final dimensions of your sticker. Make sure you understand those dimensions before you accept your proof.
The image on the left I did as a 3×3 die cut sample batch. The end result was a 3″x1.9″ sticker. That 3″ wide at the blog URL and 1.9″ width from the bottom of the URL to the top edge.
The right image I actually did as a 4×4, thinking I’d add the extra inch for the social media logos. The proof was 4″ wide and 3.98″ tall. The end result was a sticker that was a little bit bigger than I had anticipated, but I actually love it even more!
Multi-sticker discount! Now, in my situation I decided on the second design about a week after I submitted my first. Sticker Mule does offer multiple design discounts when they are placed in the same order. So if you have more than one design you’d like to get then submit them all at once for the discount.
Proof Accepted, the wait begins!
After I saw my proofs I was totally excited to get my stickers! Luckily, I didn’t have to wait terribly long and I got updates from Sticker Mule throughout the entire process. I knew when my stickers finished production, when they shipped, and I even gotten notification of when they were delivered.
Personal Touch
When the stickers arrived they came in a very distinct Sticker Mule padded envelope. Inside were my stickers and a cool coaster personally signed by the person that created my stickers. I was more than happy to oblige the request on the coaster by snapping some photos of my finished products and posting them on social media, shouting to the world how happy I am with my stickers! They even kicked in some of their own stickers, and I proudly rock those on my laptop to show them some love and help spread the word about them.


Above: the coasters and stickers from each of my orders
Below: The envelope and both orders mixed together.

Now Stick’em!
Now that they are here I couldn’t wait to stick them on my gear. I put them on my laptop, on my tablet case, and threw one on the back of my phone case. Now the logos will proudly be displayed when I’m in a session taking notes, writing a blog post, or snapping photos. I even stuck one on the back of my vehicle window, because they are weather proof!


Thank you Sticker Mule!
I wrote this blog post because I had an amazing experience. The process was really easy, and for the price you get a really high quality product. This blog post was not sponsored by Sticker Mule, I personally just want you to know how great they are. So, if you’re interested in custom stickers for yourself, maybe for work or your small business, or other purpose, I can’t recommend Sticker Mule enough. Click the link below, or the one at the top, and sign up for their email newsletter. You’ll be notified of product specials and other news from Sticker Mule. Just for signing up, that’s right NO PURCHASE NECESSARY, you’ll get a $10 credit towards your first order (of $30 or more). And, if you do end up making a purchase using this link it will give me a $10 store credit for sharing the love, and I thank you in advance.