
 PowerCLI is a very powerful scripting language written as a set of Microsoft PowerShell Cmdlets. If you’re not familiar with PowerShell I highly recommend you take a look at it as it is the defacto way to administer anything Microsoft, particularly if you’re looking to automate routine tasks.
I recently got started with PowerCLI, and PowerShell to be perfectly honest, and so I thought it would be helpful to create this step-by-step guide for others looking to get started.
PowerCLI used to be a separate downloadable executable that you’d have to run into order to install and use unit. Well, that is no longer the case, and while the installers are still available the easiest way to install PowerCLI is to just use the PowerShellt cmdlet Install-Module.
Now, because you’re installing a module from the internet you’re going to have to modify your Execution Policy in PowerShell. By default the policy is set to “Restricted” and you cannot run any cmdlets that are downloaded from the internet. To allow PowerCLI to run you can either set your PowerShell Execution Policy to “Unristricted,” which is probably fine if you’re doing this on a personal computer or your development environment, or your other option is RemoteSigned which allows you to run cmdlets that are signed using a certificate from a trusted CA.

To check your current Execution Policy settings open a PowerShell prompt and enter Get-ExecutionPolicy and press enter. By default it’ll return “Restricted.”
To set your Execution Policy you’ll need to run PowerShell as Administrator (right click on the PS icon and select “Run as Administrator”) then at the prompt type “Set-ExecutionPolicy RemoteSigned”

You’ll be prompted to confirm that this is what your want to do, type Y for yes and then press enter.
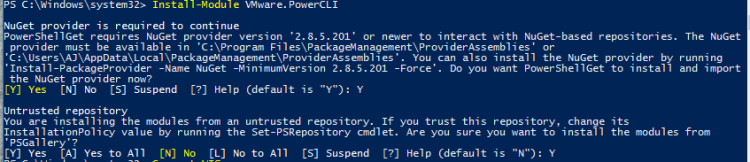
Now, we need to go grab the PowerCLI Module. To do this simply type “Install-Module VMware.PowerCLI” and follow the prompts.
Once the modules have been downloaded you can test if they’re working by trying to connect to your vCenter Server. Do this using the commend Connect-VIServer. You can specify the vCenter server you’d like to connect to by typing “Connect-VIServer Your-vCenter” or you can simply press enter and you’ll be prompted to enter in the name, or names, of the vCenter server you’d like to connect to. Be sure that your current logged on using as privileges to access vCenter, otherwise you’ll have to specify credentials.

And that’s it, now you can start playing with PowerCLI!
As of this writing the latest version of PowerCLI is 6.5.2, released on August 8th, 2017.
For more information on PowerCLI and getting started checkout:
VMware Technology Network (VMTN)
