
I’ve fast become a big fan of Visual Studio Code for my ISE (Integrated Software Environment). I’m using to develop/learn PowerShell, Power CLI, and Python. For me the default color scheme is easy on the eyes when I’m working, the contextual highlights bring my attention to something when it’s not correct, and it integrates with Github out of the box as well, although some assembly is required.
In this post I’ll go through the detailed steps of configuring Visual Studio Code to work with Git and Github to keep track of your code.
So, first things first – if you don’t already have them installed go get Visual Studio Code and Git, install them both and come back… Also, get yourself a Github account if you don’t already have one.
So, one thing I really like about Visual Studio Code is it’s native support for Git. Honestly, I had little clue as to what Git was even just a few weeks before writing this article. Git is an SCM, which is Software Configuration Management. It’s a way to track changes to your code as you develop it. As I was developing a PowerCLI script once I got a version working I would create a new version for the next feature I wanted to add to my code. Before I knew it I had a bunch of different files with various levels of complexity, features, and functions.
With Git if you have your code to a working “production” level you can maintain it, but still develop it by adding what Git referrers to as “branches.” So, if you have a bug you need to fix or a feature you want to add you can create a new branch to address a specific scenario. This allows you to maintain your master code which you know works. Once you get the branch to a level of confidence you can then merge it to the master and delete that branch.
Configuring Git
Before you can even start using Git there is some really basic config you need to do, which is set your name and email address. This could be your name and actual email address, or maybe some pseudo name and email address you using for coding. Doesn’t matter to Git. Once Git is installed open the Git bash window and we’ll get started.
Now, you can set your information globally or per local repository. To set your name global use the command:
git config --global user.name John Doe
Then, set your email address:
git config --global user.email jdoe@gmail.com
If you want to configure your name and email to be something else just for the working directory you’re in then just omit the –global from the commands about.
Literally, that it. Now you’re ready to start working with Git. Once you open a folder in Visual Studio Code you can start tracking changes to your code that you store within that folder. Just look for the Source Control icon in Visual Studio Code.

Git and Github
So, Github is a great place to store your code, as well as share your code. A free account let’s store your repositories publicly, so anyone can see what you’re working on. For a nominal fee you can create private repositories.
Now, once you have Git configured to work with Visual Studio Code taking things to the next level and connecting it with Github is pretty easy.
I find it easiest to start by creating my repository on Github and then going to grab it from there with Git.
Once you have a repository on Github you want to work with then we need to go grab a copy of it from Github using Git. To do that open the Git Bash terminal, and then move to a directory where you want to download a copy of your code from Github and work on it. Navigating in the Git Bash terminal is just like using the command line or Linux/Apple bash terminal. So for me I just use the Downloads folder in my Windows profile.
cd C
cd Users/username/downloads
That should do the trick. Now let’s download a copy of the repository that we want to work with:
git close https://github.com/USERNAME/REPOSITORY
Replace USERNAME with your github username and then REPOSITORY with the repository you want to download. If all goes well you’ll see some feedback from get that it’s download your code into the directory you’re in into a folder with the same name as your repository.
After the repository is downloaded go back to Visual Studio Code and the go to File > Open Folder. Browse to and select the folder we just downloaded from Github. Once that’s done you should see any working code you have in their, or create a new file in that folder to begin tracking changes to it.
Commits
Once you’re down working on it you need to do a commit and then a push. You can do that all from with in VSC. Once VSC sees that you’ve made a change you’ll need to commit by clicking on the check mark in the Source Control panel in VSC.
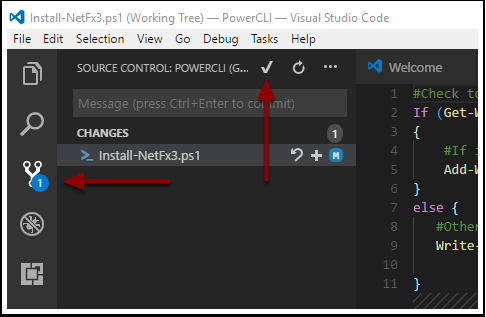
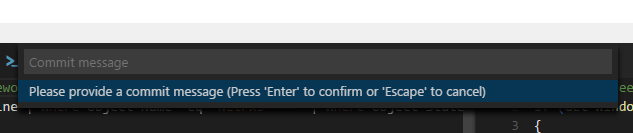
Notice the SCM icon has changed to indicate there is a pending commit. To execute the commit click the Check mark up top. You’ll then NEED to enter in a comment for the commit. I can’t stress that enough. If you leave the box blank my experience has been that the commit doesn’t happen and your code doesn’t sync.
Enter in a comment that states what you’ve done here. After you’re all done you need to do a push, or synch your changes back up to Github. You can do that from VSC SCM panel just by clicking on the sync in the lower left hand corner:

When you click on it you’ll be presented with a Github authentication Window. If this is something you do often you can cache your username and password for Github in Git.
The first time I did this I found this information in bits and bites on various sites. I hope you found it useful having it all in one place!
