
In this article I’m going to discuss managing Cisco Nexus OS images. Upgrade/down grades, and converting to a Cisco ACI images. Nexus is very similar in many ways to IOS, and in many ways it’s very different.
Probably one of the most notable differences is the size of the image. Average Nexus images come in at just shy of a gig, while other IOS-XE images usually top out around half that. Let’s take a look:
Nexus v7.0 – 964.2MB
Nexus v9.3 – 1347.8MB
Nexus ACI 4.2 – 1845.93MB
IOS-XE Fuji – 672.35MB
IOS 15.2 – 23.23MB
What’s the “big” deal??
NX-OS is actually based off of Linux – Wind River Linux to be exact -developed by Wind River Systems. Wind River develops operating systems for embedded devices and Networking is one of their main verticals. Their OS can be found in other popular networking vendors. Of course it has been customized by Cisco to have the Cisco look and feel we all know and love.
File Transfer
So, due to it’s larger size transferring NX-OS files by FTP would take forever! In fact, it’s not even an option. In NX-OS FTP is not a file transfer option. You can, however, use USB and SCP.
As Network Deployment Engineer at Red River I do a lot of staging of switches and routers, and other devices. For this purpose I prefer to use a USB drive. I’m typically right in front the switches and have direct physical access, so using a USB drive is pretty easy. I’m also typically not doing hundreds of switches at once.
However, as a network operator of a large network full of deployed switches it might not be feasible to take a USB drive around to each and every switch that needs an upgrade, particularly if they’re at a remote location. That’s where tools like SolarWinds SFTP/SCP server for Windows, and OpenSSH for Linux (or Windows) comes in.
Now, don’t go reaching for that Terabyte USB Drive!
If you’re going to use a USB drive go digging through the depths of your desk drawers and look for the cheapo you got from a vendor at a conference. The smaller the better, but of course large enough to fit the file onto. This is because NX-OS is happiest reading from FAT32 partitions, which of course you cannot format larger drives with.
For just such a purpose I always carry a 16GB SanDisk Cruzer Glide, or two, in my bag.
Let’s do this!
You’ve got your file loaded onto your USB stick and now you’re ready to go. Locate the USB port(s). You can typically find those located near the management ports – Console, OOB Management ports. So, on 1 or 2 RU switches it’ll typically be on the rear, but on some larger switches, like a chassis switch, it’s usually on the supervisor card on the front – also near the management ports.
Insert the USB drive and then take to the console. I like to start by confirming the switch can view the files on my usb drive by doing dir usb1:, this lists the files/folders on the device plugged into USB port 1.
switch# dir usb1:

       8192    Sep 17 08:38:20 2019  System Volume Information/
 1011037696    Sep 17 08:18:38 2019  nxos.7.0.3.I7.6.bin

Usage for usb1://sup-local
 1011073024 bytes used
14347395072 bytes free
15358468096 bytes total

switch#
Once I confirm the file I’m looking for is present I’ll check to make sure there’s enough space available for it on the bootflash of the switch I’m working on. Then I’ll copy the file over to the system bootflash using the copy command. The syntax is copy <source> <destination.> You can specify the source and destination file names or just leave it empty and be prompted.
switch# copy usb1: booflash:
 Enter source filename: nxos.7.0.3.I7.6.bin
 Copy progress 1% 10125KB
In this case I’m using the current gold star for this deployment. The Gold Star is the version recommended by Cisco for it’s stability and reliability.
With the file copied over you run the command show bootfash:filename cksum to view the checksum or MD5 hash of the file. Compare that with the check sum found on the Cisco downloads site to ensure the file transfer was successful and the file is (still) valid. If the check sum results do not match do not proceed! Instead delete the file and try the download and copy again.
Now, let’s set the boot file we want to use. Move into global config mode, and then use the boot command. The switch will verify the file first. Then exit back our of global config mode and save the configuration.
switch# config t

Enter configuration commands, one per line. End with CNTL/Z.

switch(config)# boot nxos bootflash:nxos.7.0.3.I7.6.bin

Performing image verification and compatibility check, please wait....

switch(config)# end


switch# copy run start


[#                                       ]   1%
The switch will save the current running config. After that, issue a reload command to reboot the switch. Upon reboot the switch will boot according to file you specified, so long as it’s present in the bootflash.
As the switch is reloading monitor the progress for issues. Once the switch comes back up login and then issue the show version command to confirm the system booted to the desired version.
switch# show ver

Cisco Nexus Operating System (NX-OS) Software
TAC support: http://www.cisco.com/tac
Copyright (C) 2002-2019, Cisco and/or its affiliates.
All rights reserved.
The copyrights to certain works contained in this software are
owned by other third parties and used and distributed under their own
licenses, such as open source.  This software is provided "as is," and unless
otherwise stated, there is no warranty, express or implied, including but not
limited to warranties of merchantability and fitness for a particular purpose.
Certain components of this software are licensed under
the GNU General Public License (GPL) version 2.0 or
GNU General Public License (GPL) version 3.0  or the GNU
Lesser General Public License (LGPL) Version 2.1 or
Lesser General Public License (LGPL) Version 2.0.
A copy of each such license is available at
http://www.opensource.org/licenses/gpl-2.0.php and
http://opensource.org/licenses/gpl-3.0.html and
http://www.opensource.org/licenses/lgpl-2.1.php and
http://www.gnu.org/licenses/old-licenses/library.txt.

Software
  BIOS: version 07.65
  NXOS: version 7.0(3)I7(6)

  BIOS compile time:  09/04/2018

  NXOS image file is: bootflash:///nxos.7.0.3.I7.6.bin
  NXOS compile time:  3/5/2019 13:00:00 [03/05/2019 22:04:55]


Hardware
  cisco Nexus9000 93180YC-EX chassis
  Intel(R) Xeon(R) CPU  @ 1.80GHz with 24633600 kB of memory.
  Processor Board ID FDO

  Device name: switch
  bootflash:   53298520 kB
Kernel uptime is 0 day(s), 0 hour(s), 1 minute(s), 47 second(s)

Last reset at 518477 usecs after Tue Sep 17 13:38:35 2019
  Reason: Reset Requested by CLI command reload
  System version: 7.0(3)I4(2)
  Service:

plugin
  Core Plugin, Ethernet Plugin

Active Package(s):


switch#
Now, the above walk through will work whether you are upgrading or downgrading. However, if you’re converting a switch to work in ACI Mode the process is just a little bit different…
Preparing a Nexus switch for ACI
So, you’re finally moving to Application Centrix Infrastructure and you need convert some existing Nexus 9000 series switches to ACI. Or perhaps this is a new ACI deployment and some of your switches arrived running NX-OS rather than ACI code – it happens – and it’s really easy to move the switch to ACI code and back to NX-OS.
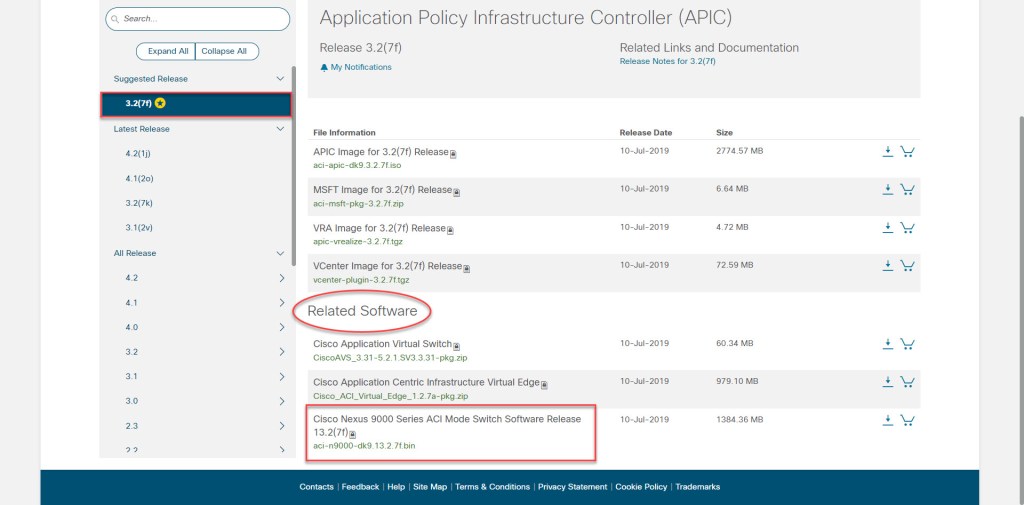
To do this first identify the ACI code you’re going to. The code must be equal to or earlier than the code running on your APIC. So, in order to make sure you’re running compatible ACI code on your switch I would recommend browsing the Cisco downloads site starting with the APIC.
Go to the Cisco downloads site, in the search box type APIC, and then select “Application Policy Infrastructure Controller (APIC)” from the suggested list.
Then click on APIC Software. Using the left hand navigation pane click on the version of code your APIC is running.
Let’s use the current gold star for example: Click on 3.2(7f), and then in the right hand side of the window scroll down. Under the heading Related Software you’ll see “Cisco Nexus 9000 series ACI Mode Switch Software Release.” This is the ACI Mode code that matches this APIC Release. Notice that last few characters of the file name matches the APIC code version. …3.2.7f.bin.
Once you’ve downloaded the ACI mode software, copy it to your USB drive or SCP server and then copy it to the bootflash of your switch.
switch# copy usb1: booflash:
 Enter source filename: aci-n9000-dk9.13.2.7f.bin
 Copy progress 1% 10125KB
With the file copied over now we’ll tell the switch what file to use to boot from. But, first we have tell the switch NOT to boot using NX-OS code. Then save the config here. Next, we’ll tell the switch what to use for ACI mode. DO NOT SAVE THE CONFIG HERE. If you do, the switch will load into the loader prompt, which is the Nexus equivalent of the IOS ROMMON. I learned this the hard way…
switch# config t

Enter configuration commands, one per line. End with CNTL/Z.
switch(config)# no boot nxos
switch(config)# copy run start
switch(config)# boot aci bootflash:aci-n9000-dk9.13.2.7f.bin

Performing image verification and compatibility check, please wait....

switch(config)# end

switch# reload
Then, reload the switch. You’ll know the switch is in ACI mode because after the switch boots up you’ll see it waiting for Fabric Discovery.
Now, if you’re already running in ACI mode and you need to do an upgrade then check out my previous post on how to do that, as that’s done through the APIC.
If you need to go back to NX-OS from ACI mode then there’s a little bit of a process. If I had a Nexus switch right in front of me I’d love to walk you through the process. Since I don’t, I’ll link you out to the Cisco Documentation that can guide you through that process.
I hope you enjoyed this article on Managing NX-OS and that you found it useful. Please leave your feedback in the comments and as always don’t forget to follow me on Twitter and Instagram.
