
How to Start your Network Automation Journey with Ansible: Part 2
In Part 1 of this series of I showed you how to install and setup your Ansible ACM and working environment. In Part 2 we’ll begin configuring your inventory file and run your first playbook. Let’s get started!
Ansible.cfg
The Ansible config file defines some important environment variables. Here’s what my ansible.cfg file looks like:
[defaults]
inventory            = inventory
host_key_checking    = False
retry_files_enabled  = False

[persistent_connection]
command_timeout = 60
These are default configurations that can be strictly set in your environment. Let’s go line by line. The first line ‘inventory‘ states that what kind of inventory file we’re going to use. There are a few options but the two most popular are .ini and YAML. Here we are expressly setting the inventory file to be the ini version of the inventory file.
The next line ‘host_key_checking‘ this checks the SSH key presented to the host you’re connecting to. Since this is a lab we’re just going to disable this using the False keyword so it makes connecting a little easier.
The next statement is ‘retry_files_enabled‘ and we’ll also set that to false. When a playbook fails the default action is to create a .retry file. When playbooks fail to run against a host Ansible creates a retry file name ‘hostname.retry.‘ The file outlines the problem Ansible had running the play. In a production environment this might be useful to you, however, in a lab where we will likely run into an issue or two it’s best we just stop Ansible from doing this as the retry files can clutter your Ansible directory.
The last line specifies how long Ansible should try to run a given task for. If. you go to run a playbook and once of the hosts is offline Ansible will continue to try to contact the host, in the case, for 60 seconds. Once it fails it will not try to run tasks against that host for the rest of the tasks in that playbook to expedite the process.
Once your ansible.cfg file looks like save it and Cyber Duck will do it’s magic and upload it back to your ACM.
Minimal Config on Lab Devices

So here is my lab. Picutred from top to bottom: 1x 800 series branch router, 2x 2960S 48 port switches, 2x 3750 48 port PoE switches, and 3x 2921 Routers. Additionally, and not pictured, I have a virtual environment with some virtual CSRs running.
Ansible is agentless but it does work over SSH. In order for that to work we need to put a bare minimum config on each of these devices to enable ssh, which is a hostname, a domain name, generate a self-signed certificate, a local user account with privilege 15 or an enable password, and then enable SSH on the vty lines with login local. When I add user accounts to my lab add at least two, one that I use to login and configure the router and the other that will strictly be used by Ansible to distinguish which made the changes. I would recommend doing this in a production environment as well. Lastly, you’ll need to enable an interface with an IP address reachable from your Ansible server.
The following is a short script that you could modify and paste into your lab devices as a bare-bones config.
hostname R1
ip domain-name noblinkyblinky.com
crypto key generate rsa moduls 1024
ip ssh version 2
username admin secret cisco
username ansible secret cisco
enable secret cisco
line vty 0 4
login local
logg sync
transport input ssh
exit
interface gig0/0
description MGMT
ip address 10.76.1.21 255.255.255.0
no shut
exit
Inventory File Setup
My favorite part of Ansible has to be the inventory file. You can set it up in so many different ways. You can list your devices, group your devices, you can even have nested groups of devices. How you group your devices can help streamline how you pushout configurations and your playbooks. Let’s start with the basics.
Your inventory file could be as basic as just a list of hostnames, like so:
R1
R2
R3
CSR1
Here I have listed four of my routers. R1, R2, R3, and CSR1. If I was using an internal DNS server and those hostnames resolved to IP addresses that’s literally all I’d need. However, I don’t have an internal DNS server so we have to inform Ansible of the IP address for these devices that it must use to connect to them. We do that by adding variables. Variables can be defined within the inventory file, which we’re about to do, or they can be defined specifically in variable files. So we need to add the following:
R1 ansible_host=10.76.1.21
R2 ansible_host=10.76.1.22
R3 ansible_host=10.76.1.23
CSR1 ansible_host=10.76.1.30
We need to specify some other variables but these variable are concerned with logging into the devices and since that’s the same across all devices we can state it once in a variables file that is use on all devices.
Login to your ACM server, navigate to your Ansible directory and create following folder and file:
cd ansible
mkdir groups_vars
cd group_vars
touch all.yml
Group_vars is a folder that ansible looks for. In here you can store YAML files that are named groupname.yml. Since we are creating variables that currently apply to our entire inventory we can use the group ios. Open the ios.yml file from Cyber Duck and enter in the following:
---
ansible_network_os: ios
ansible_user: ansible
ansible_password: cisco
ansible_become: yes
ansible_become_method: enable
ansible_become_password: cisco
...
This tells Ansible we’re working with Cisco IOS, what username and password it should use when connecting to devices, that it should use enable to authenticate to be able to make config changes and what the enable password is.
A quick word on Ansible and passwords. For lab environment you’re probably okay storing unencrypted, cleartext, passwords on your Ansible ACM. If you’re considering setting up Ansible for production use I’d strongly recommend you consider storing passwords and other sensitive variables in an encrypted file, called a vault.
Now, a quck jump in groups. If you were using more than just Cisco devices in your lab you could do something like this – define a group called in your inventory called IOS, add IOS devices to the group, and then declare the same variables in the IOS group – like so:
[ios]

[ios:vars]
ansible_network_os=ios
ansible_user=ansible
ansible_password=Zg&XlZ5D@k35
ansible_become=yes
ansible_become_method=enable
ansible_become_password=cisco

[ios:children]
routers

[routers]
R1 ansible_host=10.76.1.21
R2 ansible_host=10.76.1.22
R3 ansible_host=10.76.1.23
CSR1 ansible_host=10.76.1.30
Optionally – You could also take those same variables in the inventory file and stick them into a file called ios.yml in the group_vars folder, now that we have a group called IOS. As you’ll see in a future post thoughtfully designing your groups and variable can really help with your deployments.
Next, I create a nested group called routers under the ios group using ios:children. In the future I could add another nested group called switches.
Okay, now that we have our inventory defined and we’ve told Ansible how it will connect to these hosts lets create a playbook!
Your First Playbook
Recall a Playbook is a list of tasks. These tasks are usually aligned to some sort of workflow. For us we’re going to create a workbook that deploys a standard configuration set across all devices, for consistenacy.
A common device config is NTP, or Network Time Protocol. Having an accurate trusted time source is key so the devices can all agree on what time it is. This makes it so accurate time is is stamped on to log enteries, and if all the devices are using the same time source it’s easier to correlate events across devices.
To configure time manually on a Cisco device we’d need to set timezones, specify a name, the offset from UTC, and an NTP server. If you’re using a pool of NTP servers then you’ll set your NTP server to a DNS name, but we’ll have to ensure DNS look up from your device is enabled, a name server is present, and a default gateway is configured so your lab device can reach the internet. Sounds simple but here’s a list of commands:
clock timezone EST -5 0
clock summer-time EDT recurring
service timestamps debug datetime msec localtime show-timezone
service timestamps log datetime msec localtime show-timezone
ntp server time.google.com
ip name server 208.67.222.222 208.67.220.220
ip domain-lookup
ip defaut-gateway 10.76.1.254
So, I live in the Eastern Timezone which has -5 hour offset from Universal Coordinated Time. EST is just a name you could called it whatever you want – but as set later I want the timezone to show up in the log time stamps so might as well name it what it is. In this timezone we observer daylight savings time so I specify that with the clock summer-time recurring command. Then, I specify I want to see the local time and the timezone in the timestamps for debugs and logs the two service timestamp commands.
Next, I specify that we’re going to use time.google.com, yes Google has a timeserver. Google has a huge network and runs their own atomic clocks in their data centers. These are available or public consumption so we’ll use this as our time source.
Since we’re using a domain name to reach out time servers we’ll need to specify DNS servers to use and make sure that domain lookup is enabled. Lastly, we need to make sure we can reach the internet so we need a default gateway. My internal lab network at home here is 10.76.1.0/24 and the default gateway is .254.
Now, we could go device to device and set this configuration but that defeats the purpose of using Ansible to do the logging in and configuring for us.
Using a couple different modules here’s what our first playbook should look like:
---
  - name: My First Playbook
    hosts: routers
    gather_facts: no
    connection: network_cli

    tasks:

      - name: Configure Name Servers
        ios_system:
          lookup_enabled: yes
          name_servers:
            - 208.67.222.222
            - 208.67.220.220
          state: present

      - name: Timezome and Timestamps
        ios_config:
          lines:
            - clock timezone EST -5 0
            - clock summer-time EDT recurring
            - service timestamps debug datetime msec localtime show-timezone
            - service timestamps log datetime msec localtime show-timezone
            - ip default-gateway 10.76.1.254

      - name: Set NTP Server
        ios_ntp:
          server: time.google.com
          logging: false
          state: present
...
So, above is the contents of a playbook called myfirstplaybook.yml, stored at the root of the Ansible directory that I’m working in. Starting from the top the file opens with three dashes (—). This denotes the beginning of our YAML file. Indentation is extremely important in a YAML file. If it’s not correct that could cause the file to fail.
Next, we say we’re running this on a group called routers. You could also say all or list individual hosts that you want to run this playbook against.
Gather_facts can be used do just that, gather information about each device and populate Ansible variables. We can discuss that in a later post but for right now let’s just disable that.
The last line if the first header specifies the connection being made here is over the network via cli, or SSH.
Next, we create our first task in this playbook. Notice the tasks are indented from the beginning of the play. You can run multiple plays in a playbook if you have a workflow that goes across multiple device types. That’s the beauty of Ansible and automation!
So in our first task we use the ios_system module to enable name lookup and specify the DNS servers we want to use. Then each time this task is run it’s going to check and make sure this code is present. If it’s not, or it’s been modified from the desired stated here it’ll add it back.
      - name: Configure Name Servers
        ios_system:
          lookup_enabled: yes
          name_servers:
            - 208.67.222.222
            - 208.67.220.220
          state: present
In the next task, we use the ios_config module. This module lets you add lines of code as you would type them into a device. If no other specific module exists to do what you need to do then you can use this module. So, here we’re defining our timezone name and UTC offset, adding daylight savings, stating timestamps for debugging and logged events should include the timestamp, and then on the end we tack on the default gateway statement.
      - name: Timezome and Timestamps
        ios_config:
          lines:
            - clock timezone EST -5 0
            - clock summer-time EDT recurring
            - service timestamps debug datetime msec localtime show-timezone
            - service timestamps log datetime msec localtime show-timezone
            - ip default-gateway 10.76.1.254
For the last task in the playbook we are using the ios_ntp module to specify the NTP server we want to use.
      - name: Set NTP Server
        ios_ntp:
          server: time.google.com
          logging: false
          state: present
Lastly the three periods at the end denotes the end of your YAML file. This is optional but best practice.
Running your Playbook!
Running a playbook is easy. Login to your ACM, navigate to your Ansbile folder and then run the following command:
ansible-playbook myfirstplaybook.ymlNow, before you do that if you want to see things at work SSH into one, or all of your devices, and enable terminal monitoring, which will display log messages on the terminal on your SSH session. This is enabled by default on console session. To enable it just SSH into the device and type terminal monitor, or term mon for short.
Okay so run the command and you should see the following or similar output:

Ansible runs the playbook and you can see for each task the name of the task as defined in the playbook file and noting that each device was touched and modified. At the end we see an overall playbook recap summarizing what took place on each device.
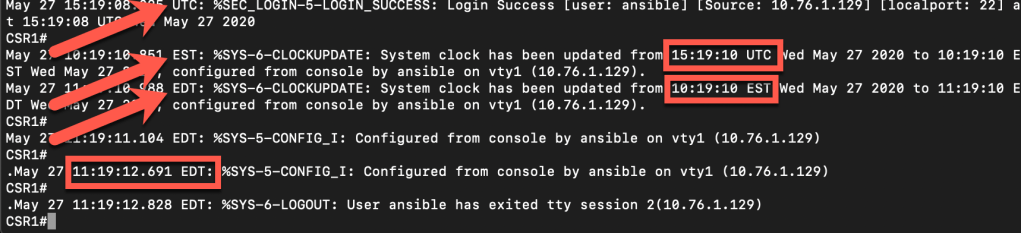
If we look back at the device we can actually see when Ansible logged in and that each change was made, including the updated time stamps from UTC, to EST, and finally EDT. Additionally we can see from the output this was all done by the user ansible.
There are some modifiers we can throw on to get some additional information. If we want to limit the playbook to run on just a specific device we can use –limit and then the device name..
ansible-playbook myfirstplaybook.yml --limit CSR1
or list a comma separeted list of devices like:
ansible-playbook myfirstplaybook.yml --limit CSR1,R3Additionally, if we want to get some more feedback on the progress of the execution of the playbook we can add -v for verbose. The more “v’s” you add the more verbose the output. Usually, just one should be all you need unless you really get stuck.
Ansible Documentation
To add more tasks to your playbook, or create new playbooks, go explore the Ansible documentation for Network Automation. You’ll find all sorts of modules for Cisco IOS and beyond!
For more examples I’ve created a playbook that configure a WAN, LAN, and Loopback interface on my routers including IP Addresses and description, then I configure EIGRP with appropriate network statements, router-id’s and passive interfaces. You can watch the entire config here:
Since I’ve run this scenario over and over again I’ve even created a playbook that resets my entire lab back to the start so I can easily test new or other playbooks.
You can grab copies of inventory files, variable files, and playbooks from my github Ansible repo!
Questions? Drop them in the comments on here or my social accounts Twitter, LinkedIn, and Instagram where you may have found this post. Don’t forget to check the Ansible Documentation for Network Automation, too.
Keep watching my blog for more from me on my Network Automation Journey!

Very useful blog.Thanks for taking time and posting it.Looking forward for some more examples.
LikeLike
My fist successful ansible coding. Simple copy paste works like a charm…. Thumbs UP…………
LikeLike
Thanks for sharing the knowledge, it is very useful.
LikeLike